First, open Photoshop and create a new file by clicking File then New. A dialogue box will pop up asking you for the dimensions and the color of your new canvas. You should make your canvas a little larger than your photograph to give you some room to play with strokes and drop shadows, if you have those in mind. In this case, I've made my canvas 100 px wider and taller than the photograph to give me plenty of room. I've also left the background transparent so the edges won't show up against web pages.
Now you want to retrieve your photograph. Click File then Open and navigate to the folder where your photograph is saved. Once you've opened the file, click Select and then All, or press Ctrl + A. Next, click on Edit and then Copy, or press Ctrl + C.
Switch over to the tab of your new document and create a new layer. To do this, click Layer, New, and then Layer on the top bar, or navigate to the bottom of the right Layers pane and click on the second to last icon.
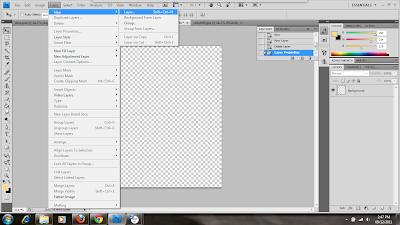
If you've used the top bar to create a new layer, a dialogue box will pop up prompting you to enter a layer name and choose other options. You can leave the default name or choose an appropriate name to label your new layer.
Click Edit + Paste or press Ctrl + V to paste the picture on the new layer. Then navigate to the Layers pane on the right side of the workspace and click on the fx at the bottom. Click on Blending Options to customize your layer styles.
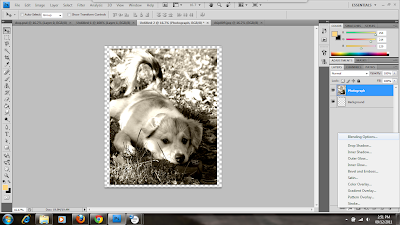
For this layer, we're going to add a stroke. Click on Stroke in the dialogue box and look over your options. For this project, I changed the size of the stroke to 50 px and put the position to Inside. This will give the border a more rectangular appearance. For rounded edges, choose Outside.
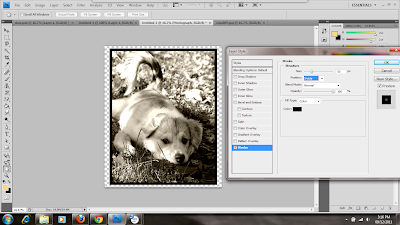
At this point, if you wanted a simple border, then you're done. You can always go back over your options and add items such as an outer glow or a drop shadow if it fits the effect you're going for. For this project, though, we're going to keep going and see how to make our border look a little fancier.
Create a new layer by navigating to the top bar and clicking Layer + New + Layer. When the new layer dialogue box pops up, give it a name and select the checkbox Use Previous Layer to Create Clipping Mask. This will allow us to fill a selection without filling the entire canvas.
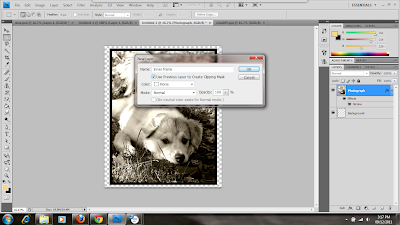
Select the rectangular marquee tool from the Tools panel on the left side of the workspace and make sure the Photograph layer is active. Make a selection on the inside of the black border, taking care not to leave any gaps.
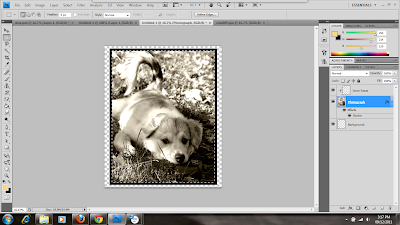
Switch back to the new Inner Frame layer and select the paint bucket tool from the Tools panel. You might find it hidden under the gradient tool, in which case you should click the black arrow at the corner of the tool button. Go to the color picker swatch at the bottom of the tools panel and choose a color you like; here, I've already chosen a yellow-orange color for my fill. Then click on the inside of the selection.
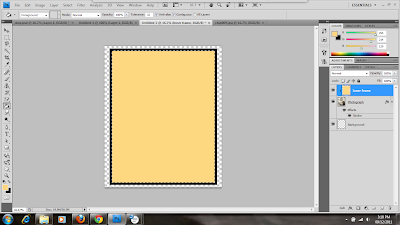
Deselect the pixels by clicking Select then Deselect. This way, you won't accidentally drag your selection out of the box when you go to make another marquee. Then, make sure the rectangular marquee tool is selected and create another box inside the first one. You can choose how big or small you want to make it. Just leave plenty of room to show the picture.
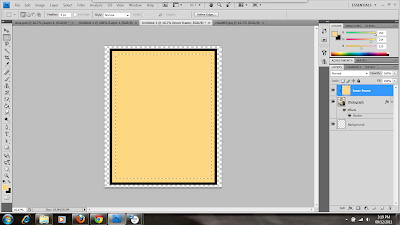
Once you've made your selection and are happy with it, press Delete to delete the pixels. Now you have a second border. You can leave it like this if you're happy with it, or you can stylize it further.
To make it look a little more realistic and 3D, navigate to the bottom of the Layers panel and click on the fx, then Blending Options. We want to give our frame the illusion of being a little higher than the photograph, so let's choose a stroke to outline it. I've left the position to Outside this time but I've lowered the opacity to 75% and made it 10 px wide. This gives it a bit of definition and the illusion of a sunken-in shadow.
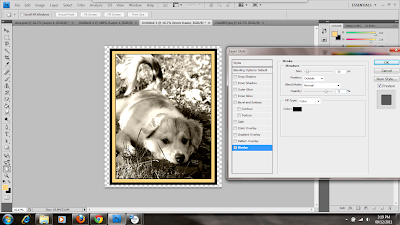
Now let's add an emboss and some texture. First select Bevel and Emboss and choose Pillow Emboss from the drop down. In this case, I only changed the size to 25 px. After that, select Texture under Bevel and Emboss. You can use the arrow to browse current patterns, and the second arrow on the drop down box to browse texture categories; the one I've chosen came from the Patterns category and is called Rusted Metal. You can choose any of the textures you like.
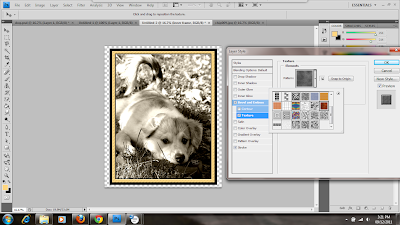
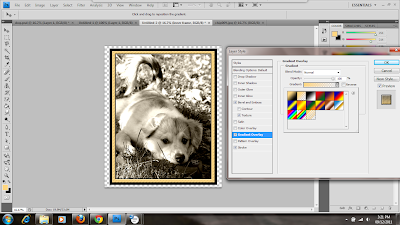
We're going to add a Gradient overlay. The default is black and white, so click on the arrow next to Gradient to get more options. I've chosen the second one, which is a fading yellow-orange.
Now we're ready to save. You can save it in any format you like, but it's best to save it in a format for the web. To do this, click on File then Save for Web & Devices. Because this is a photograph, I've chosen JPEG from the drop down box, though you could also save it as a PNG-24.
There are many ways to showcase your images and many different kinds of borders. Once you get more comfortable with creating borders, you can play around with it and see what you like best.
About CODANK Web Design
CODANK is a top rated Web Design and Internet Marketing firm located in Charlotte, NC. We are dedicated to providing the highest quality, cost effective custom software development services, delivering a broad range of business consulting and outsourcing services.
For more information, visit us at www.codank.com

No comments:
Post a Comment